
Engraved Photo
Laser engraving photos is a profitable venture in the engraving industry. However, it’s so difficult to manually prepare photos for engraving that most engraving shops in Uganda ignore and concentrate on offering other engraving services.
For you to process photos efficiently, there are several photo engraving software solutions. The most popular ones include PhotoGrav and Touch Laser Photo. These image processing software programs are fully built with functions to automatically prepare photos for engraving on a variety of everyday materials. With them, you can remain confident that the engraved photographs will be of superb quality because they don’t go wrong.
However, these software solutions are pricey. If you need one of them, be prepared to part away with not less than 400 dollars. Once you have the software, you’ll find the process of preparing photos for engraving much easier. It only takes a few seconds to have the picture ready for engraving on any material. Scan the QR Codes below to redirect you to the websites where you can request a trial version.

Photo Engraving Software
Don’t you have the QR Code installed on your phone yet? Or are you reading this article from your phone and you cannot scan? Don’t worry! Just follow these links PhotoGrav or Touch Laser Photo to visit the websites. Next time you install a QR Code Scan App on your phone, you will enjoy scanning these checkerboard squares you see everywhere. Besides, they’re a perfect marketing tool if you are in business.
Going back to our topic, if you don’t have the money to buy the photo processing software, the only option is to learn how to prepare photos manually for your engraving jobs. Although it consumes time, it’s a useful alternative way to work on the pictures for engraving. It enables you to offer engraved photographs as one of your products.
This tutorial targets specifically laser engravers, who don’t have image processing software solutions. It also targets anyone who may need to start a laser engraving business in future. Having the right skills for your photo engraving jobs always makes the tasks much more manageable.
How Do You Prepare Photos Manually in CorelDraw?
In this tutorial, we’re going to use CorelDraw Suite 5 as our design software. We assume you know how to use the CorelDraw Graphic Designing Software because it’s a design program commonly used in laser engraving.
To prepare photos for laser engraving on wood, you will follow six steps, which include the following:
#1 – Editing the photo
#2 – Resampling the image
#3 – Gamma Adjustment
#4 – Unsharp Mask Filter
#5 – Sharpen Filter
#6 – Convert to Black & White (1-bit)
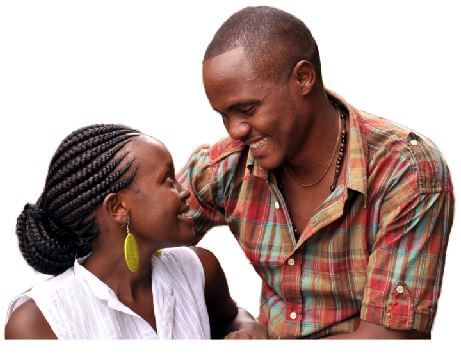
We are going to use Photograph 1 to take you through the entire process. By the end of this tutorial, you will be able to prepare photos for your engraving jobs on wood. It’s worth noting that in photoengraving, the quality of the original image matters. If you don’t know yet what constitutes a good photo for engraving, you can read further our article on engraving photos.

Photograph 1: Sample Photo
#1 – Editing the Photo.
First, open the photo (refer to Photograph 1) you have for laser engraving in CorelDraw.
Secondly, we shall have to remove the background so that it engraves well. To do this, select the photo and click on Bitmap > Edit Bitmap to open the picture in Photo-Paint.

Open Edit Bitmap

Photo-Paint
With your image opened in Photo-Paint, click on Image and select Cutout Lab from the dropdown list to be redirected to where you’ll edit the image.

Open Cutout Lab
Thirdly, click on the Highlighter Tool. You can adjust the thickness of the Highlighter Tool by adjusting the Nib size in the Tool Options. You can also change the Highlighter colour and fill colour to make them more visible. In the preview window, draw a line along the edges of the image area you want to cut out.

Highlighter Selected

Highlight the Image

Cutout Refilled
Fourthly, click on Inside Fill Tool, and then click inside the area of the image you want to cut out. Click on Preview button to view the cutout with the background removed.

Photo Background Removed

Add Remove Detail
Fifthly, use the Add Detail tool to bring back the deleted parts along the edges of the image and the Remove Detail tool to delete the unwanted detail along the edges of the image. From the Cutout results, select Cutout and click Ok. Then click on Save in Photo-Paint to save the edited image on your CorelDraw working page (refer to Photograph 2).
Photograph 2: Background Removed
#2 – Resampling the Image
Having edited the image to remove the unwanted background, we now move to the second step. This step is resampling, which means changing the pixel dimensions of the image. When you downsample, you’re eliminating pixels, and when you upsample, you add pixels.
To prepare photos for engraving, we need to increase the pixels so that all the details of the image are visible for the laser engraver to identify them. To resample, select the photo and then click on Bitmap. In the dropdown list, choose Resample to open the Resample Palette.

Select Resample
With the Resample Palette opened, you can change the image size and the resolution. In our case, we are adjusting the image size to 5 inches in width, which automatically changes the height to 3.7 inches. As for the resolution, change it to 600 dpi and click Ok.
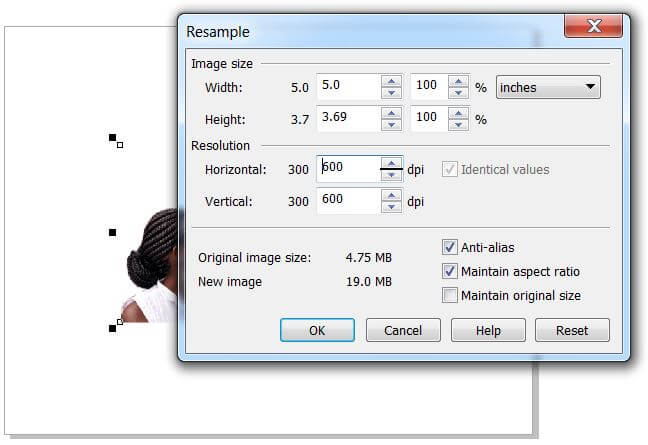
Resample Palette Opened
#3 – Gamma Adjustment
The third important step as you manually prepare photos for engraving is gamma adjustment. The Gamma effect enables you to reveal all the details of the picture without compromising its quality.
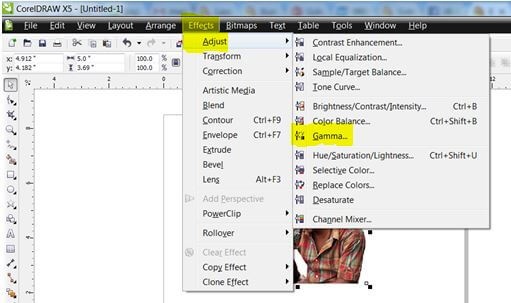
Adjust Gamma

Gamma Adjustment Made
With your photo selected, open the Gamma Adjustment Palette by clicking Effects > Adjust > Gamma. In the Gamma Palette, change the Gamma value to 3.5 as in the image above and click Ok. It will change the image by brightening it to bring out the detail in the dark areas as in Photograph 3 below.
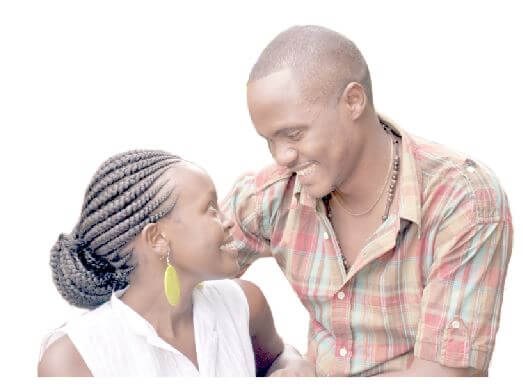
Photograph 3: Photo Changes after Gamma Adjustment
#4 – Unsharp Mask Filter
To prepare photos for engraving, the Unsharp Mask filter is a key element you must not skip. Unsharp Masking is an image sharpening technique that brings out the edge detail of the photo. To unsharp mask, the image, select the photo. With your photo selected, click on Bitmap. In the dropdown list, select Sharpen and then Unsharp Mask

Select Unsharp Mask
In the Unsharp Mask Palette, enter the following values:
- Percentage of 500
- Radius 20 and
- Threshold 6

Unsharp Mask Opened
Finally, click the OK button and the results you will get will be like in Photograph 4 below.

Photograph 4: Unsharp Effect Applied
#5 – Sharpen Filter

Select Sharpen Filter
This filter accentuates the edges of the image by concentrating on the blurred areas to increase the contrast between neighbouring pixels. With your photo selected, click on Bitmap. In the dropdown list, select Sharpen and then Sharpen.
In the Sharpen Filter Palette, enter the following values:
- Edge Level (%) 100
- Check the box for Preserve Colors
- Threshold 70

Sharpen Filter Palette
After entering the sharpening filter values above, click the OK button. That’s all with this function. You may not physically see the changes with your eyes, but they will be there.
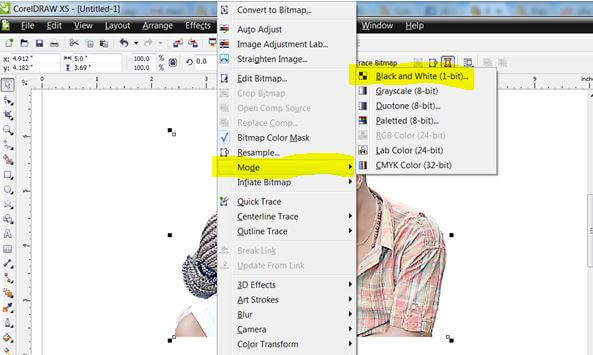
#6 – Convert to Black & White (1-bit)
The last step, as you prepare photos for engraving, is to convert them to black and white images. To turn the photo to black and white, select the picture. With the photo selected, click on Bitmap and in the dropdown list select Mode and then Black & White (1-bit) to open the palette.
Black White Palette
In the palette, you will see different types of conversion methods. These include Line Art, Ordered, Jarvis, Stucki, Floyd-Steinberg, Halftone and Cardinality-Distribution. When engraving a photograph on wood, the Halftone dithering pattern works best. So select Halftone as the conversion method. Set the Screen type as Line and enter the values 0 degrees and 100 lines per inch and then click OK. Your photo will look like the one in Photograph 5, ready for engraving.

Black White Palette Opened
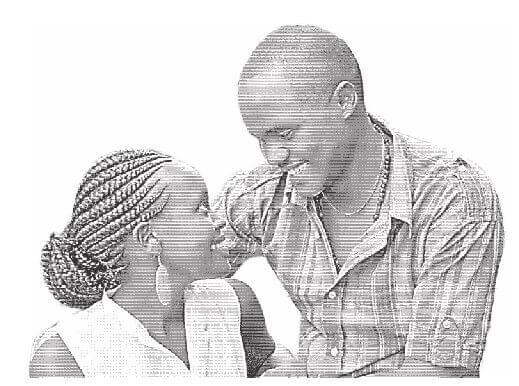
Photograph 5: Photo Ready for Engraving on Wood
When we engraved the photo we have used in our sample; the results were as in Photograph 6. Note that the quality of the engraving also depends on other factors like the laser print settings, type of wood and the quality of the original photo. In our case, we used an internet image with low resolution and a local piece of wood called Pachystela brevipes (local name “Nkalati”).
Photograph 6: Engraved Photo on Local Wood (Nkalati)
Conclusion
Learning to prepare photos manually is good because it allows you to do photo engraving jobs even if you don’t have photo processing software solutions. With the CorelDraw designing program, you can easily do it so that you don’t miss making money from offering photoengraving services.


0 Comments
Trackbacks/Pingbacks